-
移动硬盘是NTFS格式的,挂载时候kernel不支持这格式
出现:filesystem type ntfs not configured in kernel
sudo yum install *ntfs* -
安装 libsodium 库
wget https://download.libsodium.org/libsodium/releases/LATEST.tar.gz tar xzvf LATEST.tar.gz cd libsodium* ./configure make -j8 && make install echo /usr/local/lib > /etc/ld.so.conf.d/usr_local_lib.conf ldconfig -
安装 Shadowsocks
yum install epel-release -y yum install gcc gettext autoconf libtool automake make pcre-devel asciidoc xmlto udns-devel libev-devel mbedtls-devel libsodium-devel c-ares-devel -y cd /usr/local/src git clone https://github.com/shadowsocks/shadowsocks-libev.git cd shadowsocks-libev git submodule update --init --recursive ./autogen.sh ./configure make && make install -
Shadowsocks作为服务端配置
创建配置文件
 mkdir -p /usr/local/etc/shadowsocks
 vi /usr/local/etc/shadowsocks/server.json
文件内容
 {
     "server": "0.0.0.0",
     "server_port": 30023,
     "password": "",
     "method": "chacha20"
 }
添加服务管理文件/etc/systemd/system/ss-server.service,并跟随开机启动。
 [Unit]
 Description=Shadowsocks Server

 [Service]
 TimeoutStartSec=0
 ExecStart=/usr/local/bin/ss-server -c /usr/local/etc/shadowsocks/server.json

 [Install]
 WantedBy=multi-user.target
systemctl enable ss-server systemctl start ss-server -
Shadowsocks作为客户端配置
创建配置文件
 mkdir -p /usr/local/etc/shadowsocks
 vi /usr/local/etc/shadowsocks/client.json
文件内容
 {
     "server": "0.0.0.0",
     "server_port": 10000,
     "local_address": "127.0.0.1",
     "local_port": 1086,
     "password": "yourpasswd",
     "timeout": 300,
     "method": "aes-192-cfb",
     "workers": 1
 }
添加服务管理文件/etc/systemd/system/ss-client.service,并跟随开机启动。
 [Unit]
 Description=Shadowsocks Client

 [Service]
 TimeoutStartSec=0
 ExecStart=/usr/local/bin/ss-local -c /usr/local/etc/shadowsocks/client.json

 [Install]
 WantedBy=multi-user.target
systemctl enable ss-client.service systemctl start ss-client.service -
Proxychains4
安装
 cd /usr/local/src
 git clone https://github.com/rofl0r/proxychains-ng.git
 cd proxychains-ng
 ./configure
 make && make install
 make install-config
修改配置文件/usr/local/etc/proxychains.conf
 ...
 chain_len = 1
 ...
 localnet 127.0.0.0/255.0.0.0
 localnet 192.168.0.0/255.255.0.0
 ...
 [ProxyList]
 socks5 127.0.0.1 1086
之后使用composer等命令行工具的时候,使用下面命令即可。
proxychains4 composer update -
安装openssl和openssl-devel
yum install openssl openssl-devel -
安装hdf5-devel
For CentOS yum -y install hdf5-devel For Ubuntu sudo apt-get install libhdf5-dev -
安装CMake
 yum install -y gcc gcc-c++ make automake
 yum install -y wget
 wget http://www.cmake.org/files/v2.8/cmake-2.8.10.2.tar.gz
 tar -zxvf cmake-2.8.10.2.tar.gz
 cd cmake-2.8.10.2
 ./bootstrap
 gmake
 gmake install
如果步骤六报错,可能原因是关联的程序包未安装。解决方法:安装所需的程序包后,将cmake-2.8.10.2/目录下的CMakeCache.txt删掉,再从步骤六开始。
-
Linux下tar.xz结尾的文件的解压方法
tar xvJf ***.tar.xz -
Conda清华大学开源软件镜像站
#首先先添加清华的镜像源 conda config --add channels https://mirrors.tuna.tsinghua.edu.cn/anaconda/pkgs/free/ conda config --add channels https://mirrors.tuna.tsinghua.edu.cn/anaconda/pkgs/main/ conda config --set show_channel_urls yes #如果无法解决,则删除channels配置文件中部分内容 #具体操作如下: #1、快速创建channels配置文件的备份(保险起见) cp ~/.condarc{,.bak} #查看配置文件的内容 cat ~/.condarc.bak channels: - https://mirrors.tuna.tsinghua.edu.cn/anaconda/pkgs/free/ - https://mirrors.tuna.tsinghua.edu.cn/anaconda/pkgs/main/ - defaults show_channel_urls: true #2、删除部分内容 #修改后配置文件的内容如下,只保留清华的镜像源: vim ~/.condarc channels: - https://mirrors.tuna.tsinghua.edu.cn/anaconda/pkgs/free/ - https://mirrors.tuna.tsinghua.edu.cn/anaconda/pkgs/main/ show_channel_urls: true -
解决 ImportError: cannot import name ‘abs’ 导入tensorflow报错
pip uninstall tensorflow pip uninstall protobuf pip install tensorflow==1.8.0 -
安装显卡驱动
下载地址:https://www.geforce.cn/drivers
sudo chmod a+x NVIDIA-Linux-x86_64-390.77.run sudo ./NVIDIA-Linux-x86_64-390.77.run -no-x-check -no-nouveau-check -no-opengl-files # -no-opengl-files 表示只安装驱动文件,不安装OpenGL文件,这个参数最重要 # -no-x-check 安装驱动时不检查X服务 # -no-nouveau-check 安装驱动时不检查nouveau nvidia-smi # 安装完成后查看GPU和驱动程序信息 -
安装cuda9.0
下载地址:https://developer.nvidia.com/cuda-toolkit-archive
 sh cuda_9.0.176_384.81_linux.run
 Do you accept the previously read EULA?accept/decline/quit: accept
 是否自动安装nvidia显卡驱动,选择no
 Install NVIDIA Accelerated Graphics Driver for Linux-x86_64 384.86?(y)es/(n)o/(q)uit: n
 剩下的全部都yes
配置环境变量
编辑~/.bashrc文件 vim ~/.bashrc #末尾添加以下内容 export PATH=/usr/local/cuda/bin${PATH:+:${PATH}} export LD_LIBRARY_PATH=/usr/local/cuda/lib64${LD_LIBRARY_PATH:+:${LD_LIBRARY_PATH}} 编辑/etc/profile vim /etc/profile #末尾添加以下内容 export PATH=$PATH:/usr/local/cuda/bin export LD_LIBRARY_PATH=$LD_LIBRARY_PATH:/usr/local/cuda/lib64 export LIBRARY_PATH=$LIBRARY_PATH:/usr/local/cuda/lib64 使配置文件生效 source /etc/profile -
安装cudnn7.0.5驱动
下载地址:https://developer.nvidia.com/rdp/cudnn-archive
cp cudnn-9.0-linux-x64-v7.solitairetheme8 cudnn-9.0-linux-x64-v7.tgz tar -zxvf cudnn-9.0-linux-x64-v7.tgz cd cuda cp include/* /usr/local/cuda cp lib64/* /usr/local/cuda/lib64 cat /usr/local/cuda/cudnn.h | grep CUDNN_MAJOR -A 2 -
安装TensorFlow
安装pyenv
 sudo yum install zlib-devel bzip2-devel openssl-devel ncurses-devel sqlite-devel readline-devel tk-devel gdbm-devel db4-devel libpcap-devel xz-devel git
 mkdir ~/.pyenv
 git clone git://github.com/yyuu/pyenv.git ~/.pyenv
 echo ‘export PYENV_ROOT=”$HOME/.pyenv”’ >> ~/.bashrc
 echo ‘export PATH=”$PYENV_ROOT/bin:$PATH”’ >> ~/.bashrc
 echo ‘eval “$(pyenv init -)”’ >> ~/.bashrc
 exec $SHELL -l
安装tensorflow
 pip install –ignore-installed –upgrade pip setuptools
 pip install –upgrade tensorflow_gpu-1.6.0-cp35-cp35m-manylinux1_x86_64.whl
conda env list 或 conda info -e 查看当前存在哪些虚拟环境 conda list 查看安装了哪些包 conda create -n your_env_name 创建虚拟环境 source activate your_env_name 激活虚拟环境 conda install -n your_env_name [package] 给虚拟环境安装包 conda remove -n your_env_name(虚拟环境名称) –all 删除虚拟环境 conda remove –name your_env_name package_name 删除虚拟环境中某个包 -
linux关闭 X server
Ubuntu 16.04 关闭x server
 sudo /etc/init.d/gdm stop
 sudo /etc/init.d/gdm status
 sudo /etc/init.d/gdm restart
centos 7 关闭x server
systemctl stop gdm.service systemctl start gdm.service -
NVIDIA GeForce GTX 1060 驱动安装
下载地址:http://www.nvidia.cn/Download/index.aspx?lang=cn
禁用 nouveau 第三方驱动
 打开编辑配置文件: sudo gedit /etc/modprobe.d/blacklist.conf
 在最后一行添加:blacklist nouveau
 添加完成之后,执行命令:sudo update-initramfs -u
 重启使之生效:reboot
安装 NVIDIA GeForce GTX 1060 驱动
重启后按 Ctrl+Alt+F1 进入命令行界面 执行命令:lsmod | grep nouveau 禁用X服务:sudo /etc/init.d/lightdm stop 给驱动run文件赋予可执行权限:sudo chmod a+x NVIDIA-Linux-x86_64-390.25.run (下载的驱动文件名) 安装:sudo ./NVIDIA-Linux-x86_64-390.25.run -no-opengl-files 开启X服务:sudo /etc/init.d/lightdm start –no-opengl-files 只安装驱动文件,不安装OpenGL文件。这个参数最重要 –no-x-check 安装驱动时不检查X服务 –no-nouveau-check 安装驱动时不检查nouveau 后面两个参数可不加 nvidia-smi -
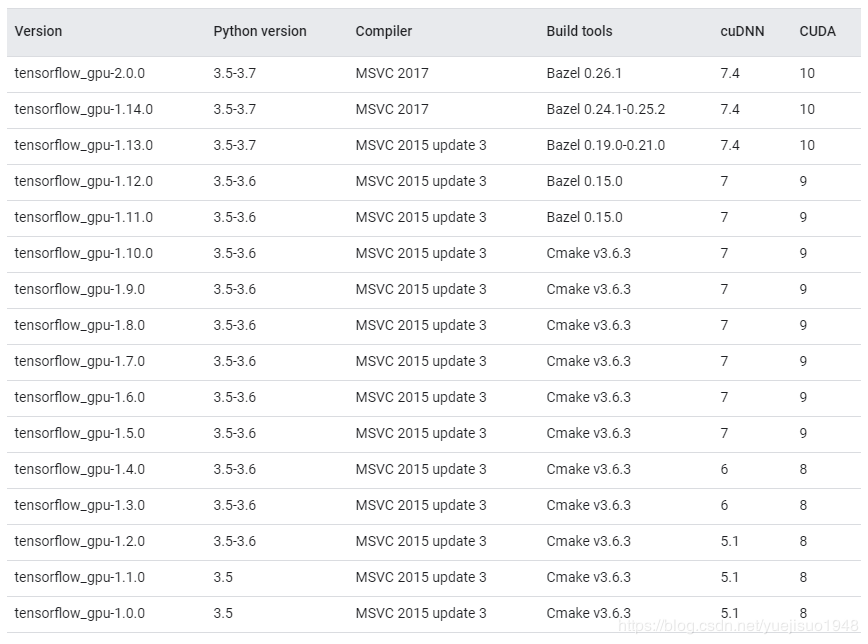
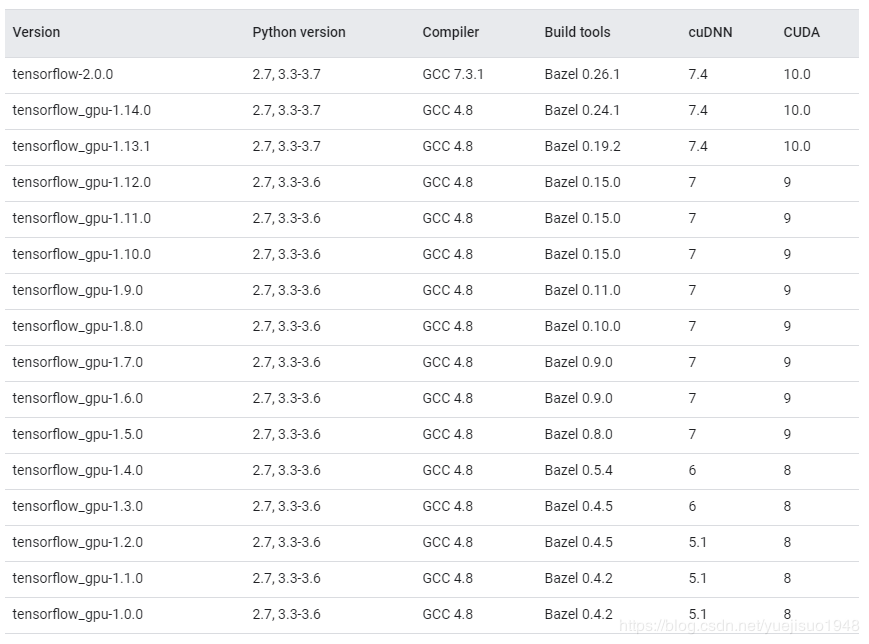
tensorflow CUDA cudnn 版本对应关系
linux下:
windows下: